

Introduction
The Projects menu is where all Zeno Mobile One projects can be accessed, created, configured and shared.
Project backup
The first time you access the Projects menu after installing Zeno Mobile One, you are presented with a pop-up explaining the back up status of all your projects.
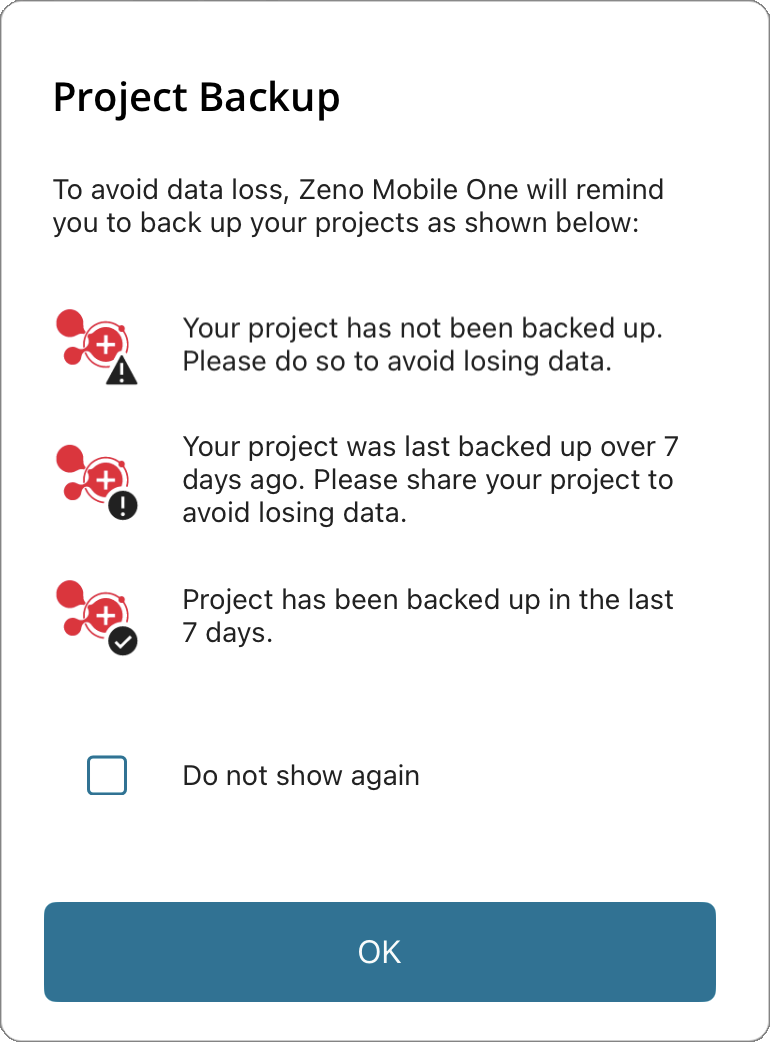
A project is backed up when you share its Zeno Mobile One project file to your device’s internal storage, to an online storage provider (for example, Microsoft OneDrive or Google Drive), or via any other sharing method.
Projects menu
The Projects menu lists the project you currently have open under Current Project, and all other projects stored on the device under Other Projects. Each entry shows the project name, project description (if applicable) and the date and time it was last modified.
Open project
On the Projects screen, tap the name of the project you want to work in and it is opened in the Main View. The project opened is then moved to the Current Project in the Projects menu.
Edit project
To configure a project such as change its name, add a description or change the coordinate system used, tap the arrow (>) to the right of the project to enter the Edit Project menu.
Add project
-
On the Projects screen, tap the blue + button (bottom right).
-
In Add Project(s) From, choose one of:
-
New Project – create an empty project or a project based on an existing project.
-
ArcGIS Web Map – create a project from an ArcGIS web map.
-
Browse – import an existing project from device storage.
-
-
Follow the prompts to finish.
To close the dialog without adding a project, tap outside it.
Select projects
-
Press and hold a project until it is highlighted. The title bar changes to show the number of items selected (for example, 1 selected).
-
Tap any further projects to add them to the selection.
-
Tap a selected project again to deselect it.
-
Tap the back arrow (<) to leave selection mode.
While projects are selected, the Share and Delete icons are available in the title bar.
If you select more than one project, you cannot share them as an ArcGIS Web Map. Remove one or more projects so only one remains, then share it as an ArcGIS Web Map.
Share as project
-
Select one or more projects.
-
Tap the Share icon in the title bar.
-
In Share As: Project, choose the format:
-
ArcGIS Web Map
-
Zeno Mobile One Project
-
-
Choose the destination or app you want to share to from the share sheet pop-up.
ArcGIS Web Map
After choosing to share your project as an ArcGIS Web Map, if you’ve not done so already in the Web Service settings, you will be asked to add your ArcGIS Online or ArcGIS Enterprise account details.
After logging in you will see the contents of your ArcGIS Online or Enterprise account.
Choose a folder to share the web map to and tap the tick in the bottom right corner.
Choose a name for your Web Map and select any of the sharing options as desired.
Tap the tick in the bottom right corner to publish the web map.
When publishing is complete you will get a success message.
Going back to the layers of the project you will now see the synchronise button is available on each layer, indicating the data is synchronised with ArcGIS Online.
When sharing a Zeno Mobile One project as an Esri Web Map, apart from the default OpenStreetMap layer, no WMS, WMTS, WFS, WFS-T or CAD files will be included.
Zeno Mobile One Project
When you share a project as a Zeno Mobile One project, the app creates a ZIP file named with the project name and the timestamp of the share and saves it to your chosen location.
A Zeno Mobile One project contains all the data and files you have created and used during the lifetime of using the project. The structure of the key folders and files of a Zeno Mobile One project is shown below:
Project 1_20260819_114001
The ZIP file containing all files and folders of the project.
Project 1
The project container.
Documents
If your project contains PDF attachments, they are stored here. This folder is absent if the project has no PDF attachments.
Images
If your project contains image attachments, they are stored here. This folder is absent if the project has no image attachments.
Observations
If your project contains observations from GPS raw data logging they are stored here. This folder is absent if you did not record any GPS raw data.
Videos
If your project contains video attachments, they are stored here. This folder is absent if the project has no video attachments.
Layer 1.shp (etc)
All feature layers in your project at stored as individually named shapefiles.
When you share a project to Microsoft OneDrive, the backup status in Zeno Mobile One is not updated, even if the project file was uploaded successfully. This is because OneDrive does not return upload confirmation to the app. Other storage providers, such as Google Drive or Dropbox, do report the result and the backup status is updated as expected. To confirm a OneDrive upload, check the project file directly in OneDrive.
Share as feature layers
To simply share all features of a Zeno Mobile One project in a specific format, export the project as feature layers.
When you share a Zeno Mobile One project as feature layers, the app creates a ZIP file named with the project name, the timestamp of the share, the file extension of the chose format and saves it to your chosen location.
When you share a project as feature layers, the ZIP file differs from a Zeno Mobile One project ZIP because it includes only the feature layers in the selected format.
Attachments, GPS raw data and other project settings are not included when exporting a Zeno Mobile One project as feature layers.
ASCII
Each feature layer is converted to an individual semi colon separated text file.
DWG
All feature layers are combined into a single DWG file.
If your project is using a geographic coordinate system such as WGS84, the DWG created will be automatically reprojected to use the World Mercator (EPSG 3395) coordinate system as CAD files cannot use coordinates in latitude and longitude.
DXF
All feature layers are combined into a single DXF file.
If your project is using a geographic coordinate system such as WGS84, the DWG created will be automatically reprojected to use the World Mercator (EPSG 3395) coordinate system as CAD files cannot use coordinates in latitude and longitude.
GML
Each feature layer is converted to an individual GML files with corresponding XSD schema.
KML
All feature layers are combined into a single Google KML file.
SHP
Each feature layer is converted to an individual Esri shapefile.
Delete a project
Delete selected projects
-
Select one or more projects.
-
Tap the Delete (trash) icon in the title bar.
-
At Delete Project(s) – Do you want to delete the selected project(s)? tap Yes to delete, or No to cancel.
Delete a single project quickly
-
Swipe a project entry from right to left.
-
Tap the Delete (trash) button that appears.
-
Confirm with Yes.
Deleting a project removes it and all its data from the device. Back up the project first if you may need the data later.
It is not possible to delete the current project in use. Open a different project in order to delete it.